Technical installation instructions
Application on roofs, vertical walls, ceiling and floorsPreserving the air gap
To bring out the full insulating potential of Komfort QUILT in protecting against energy exchange by radiation, we recommend that you preserve an air gap of at least 2 cm on both sides of the Komfort QUILT. To
maximise the soundproofing effect, Komfort QUILT must be stretched out tight to prevent any point of contact with adjacent surfaces.
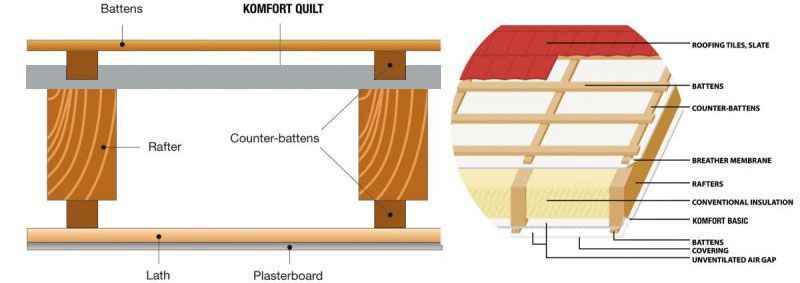
Roof Insulation from exterior
In the case of insulation from the outside, Komfort QUILT is unrolled horizontally over the rafters, starting at the bottom of the roof, and is provisionally fastened to the rafters by means of 20 mm long staples. When laying the next strips, ensure a “tile-effect” overlap of 10 cm. Cover this overlap with 100 mm wide aluminium adhesive tape supplied by our company. The spacing between rafters must not exceed 60 cm, and the Komfort QUILT strips must be stretched out tight.
The battens must then be installed as follows:
- Firstly, counter-battens measuring a minimum of 24 mm thick by 4 to 5 cm wide must be fastened on top of the rafters, vertically in relation to the eaves, using twisted nails with a minimum length of 60 mm or screws.
- Secondly, lay the battens for attaching the roofing (tiles, slates etc.) parallel to the eaves and fix them to the counter-battens.
- If decking is required in order to attach the roofing material (zinc, certain types of slate etc.), the wooden boards must be fixed parallel to the eaves above the counter-battens.
This method of installation guarantees a minimum air gap of 2 cm between the roofing and the Komfort QUILT insulation, thereby assisting infrared reflection by Komfort QUILT and ensuring ample ventilation. We also recommend the installation of roof vents. Since Komfort QUILT is waterproof and airtight, there is no need for a roof lining or vapour barrier.
Make sure that the frame is perfectly dry before installing Komfort QUILT.
Roof Insulation from interior
The first sheet of Komfort QUILT must be unrolled parallel to the ridge and fastened to the ridge board, with a 5 cm turn-down. Then stretch out the Komfort QUILT correctly and staple it to the purlins and rafters, with a maximum spacing of 20 cm between staples.
Position the next sheets of Komfort QUILT with a minimum overlap of 5 cm to the previous sheet.
Seal these overlaps with the special aluminium adhesive tape supplied by Komfort QUILT.
Fasten the bottom edge of the last strip of Komfort QUILT to the wall plate by means of staples spaced at 5 cm intervals.
Then fasten the laths for the final finish (wood panelling, plasterboard etc.) to the rafters. These laths will press the Komfort QUILT against the purlins.
Wall Insulation
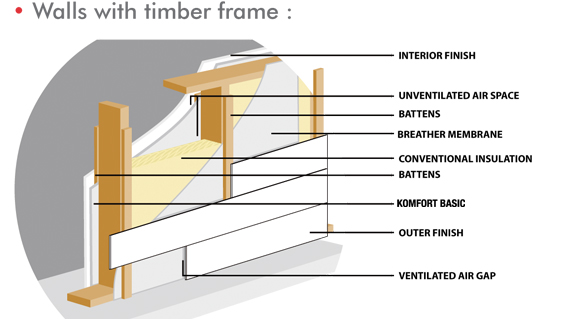 Komfort QUILT can be unrolled and installed horizontally or vertically, ensuring a minimum overlap of 5 cm between strips, on a framework of laths measuring 30 mm thick by 50 mm wide previously fixed to the wall
to be insulated.
Seal the overlaps and joins with the special aluminium adhesive tape supplied by Komfort QUILT. Provisionally fasten the Komfort QUILT insulation by stapling it to this wooden framework. The vertical laths of the framework must be spaced at approximately 60 cm. The perimeter laths must be positioned flush with the horizontal and vertical limits of the surface to be insulated.
This framework thereby establishes a stable air gap between the Komfort QUILT insulation and the insulated wall. Then fasten the counter-laths to the framework for the interior finish (plasterboard, wood panelling etc.).
Ceiling Insulation
Use the same procedure as for walls.
Floor Insulation
Unroll and staple the Komfort QUILT insulation to the timber framework, sealing the overlaps with the aluminium adhesive tape supplied by Komfort QUILT. Then screw laths measuring a minimum of 3 cm thick by 5 cm wide to the wooden floor beams. Fasten the wood or particle board flooring to these laths. If the wood floor is laid on concrete slab instead of on a timber framework, the insulation must be laid out and stapled to laths spaced at a maximum of 60 cm, previously fixed to the concrete, sealing the overlaps between successive strips with the aluminium adhesive tape supplied by Komfort QUILT.
Then screw laths measuring a minimum 3 cm thick by 5 cm wide to the base laths. The wood or particle board floor can then be fixed to these top laths.